


Flying with a Jeti radio on the aeroflyRC
 You have different options to connect a Jeti transmitter to the aeroflyRC. In all cases you use your Jeti REX receiver or Rsat2 for a wireless transmission of the control signals.
Further down on this page you`ll find infos about the basic settings in the Jeti radio menu.
Many thanks to Hepf Modellbau for their friendly support!
Option #1: PPM sum signal up to 12 channels
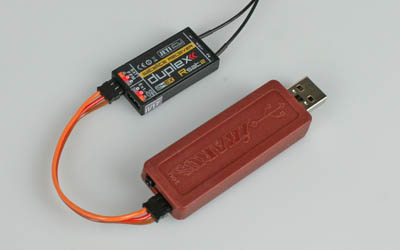 Using a patch cable you can connect the PPM output on your Jeti receiver with the IKARUS-USB interface set #3031020.
The advantages of this solution are:
- The Rsat2 or a REX receiver outputs 12 channels via the PPM signal. You therefore have a very large number of channels available for all functions!
- The receiver is power supplied via the USB interface.
- The set contains the interface and the needed patch cable.
Option #2: Single channel mode up to 8 channels
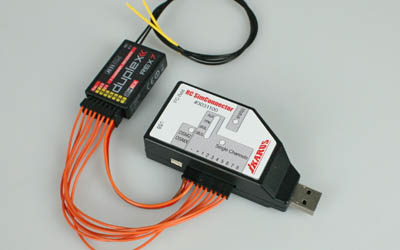 You can connect any 2.4 GHz receiver with at least 4 channels to the IKARUS RC SimConnector in the single channel mode. Also one of your Jeti receivers.
This solution transmits between 4 and max. 8 channels.
With 4 channels you can already fly throttle, elevator, rudder, aileron and all powered models, gliders, jets, helicopters and drones.
In the following we show the basic menu settings for a successful start with a Jeti at the aeroflyRC
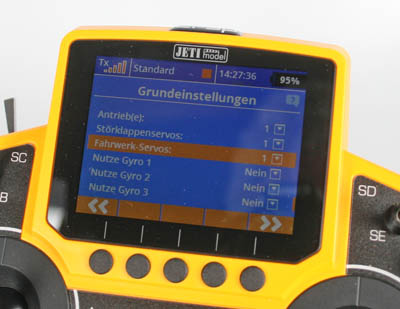
1. Basic settings on the Jeti radio
- Connect your REX receiver or yo
 ur Rsat2 to the IKARUS USB interface using the patch cable and plug the interface into the PC.
 - Open the “Model” menu and create a “New model”. Assign a name such as “aeroflyRC”.
- Select the aircraft symbol as model type (also for helicopters).
- You can skip the settings for a background image. Then select under “Basic Properties” 1 “Ail” for the wing, a normal tail type with “1H1V” and also 1 “Engine count”.
- In this menu you should also set 1 “Airbrake servo” and 1 for the “Gear”.
- In the following menu “Functions Assignment” you can check the correct assignment of the main sticks, and you can also assign an encoder (or switch) to the functions “Airbrake” and “Gear”.
- In the next menu “Servo Assignment” you should now see the 4 basic functions throttle, aileron, elevator and rudder as well as the two special functions.
- Finally, confirm the question for “Activate model” with “Yes”.
- Because the receiver is already power supplied via the IKARUS interface, you`ll be asked automatically for the binding
1a) 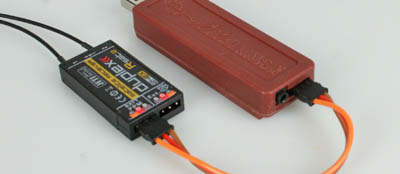 Continue with a Rsat2
- Connect the IKARUS interface to the PPM output on the Rsat2
- Start the basic programming from obove.
- In case of any channel failures please check that the Rsat2 is set to “PPM Positive” in the line “Serial Link” under “Model” / “Device Explorer”.
1b) Continue with a Jeti receiver with PPM
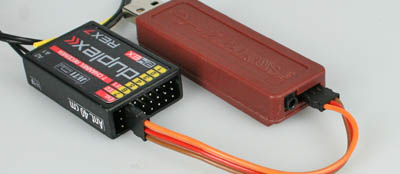 Connect your Jeti-REX receiver to the IKARUS interface #3031020 like shown on the image e.g. at the “E2” output.
-
Start the basic programming from obove.
-
If you want to use all 12 channels of the PPM signal in the aeroflyRC you should create additional function lines in the radio using the “+” in the “Function + Encoder Assignment” menu
-
Now open the menu “Model” / “Device Explorer” and select the bounded receiver. Under “Alternative Pin Config” change the setting in the “E2” line from “Servo” to “PPM Positive Out”.
1c) Continue with a Jeti receiver and the IKARUS RC-SimConnector
- Connect your Jeti receiver with up to 8 patch cables (for 8 channels) to the RC-SimConnector #3031100.
- Start the basic programming from obove.
- At the RC-SimConnector the modus LED should be permanently violet and the status LED at “SingleChannel” permanently blue.
2. Radio calibration in aeroflyRC
With this basic setting you can now continue with the calibration in aeroflyRC.
Start the aeroflyRC and click in the main menu under “Controller” on “Search for a new controller”. Afterwards you should get the interface and the detected channel number reported and follow the further instructions for calibration. If you have any issues, please follow this interface test.
You will then find all details on the professional setting menu in the aeroflyRC manuals.