


Step 1: Installing the program on Windows
Step 2: Checking for updates
Preparations
Before installing the program on a Windows PC, please update the driver for your NVDIA or ATI graphics card. If you have already done so, or want to try it without updating first, you can begin the installation. If the program does not start at the end of the installation, please note the possible error messages..
1. Step: Installing the Program
|
Requirement: To install an aeroflyRC10 from IKARUS, you need either the original IKARUS DVD or the data from a download purchase. The former RC10 download installer is no longer used. If you still have it and want to use it, you can find the former help page for the download installer here. Download Installer |
|
1.1 Installation from DVD: Insert the DVD into the drive and wait for the installation to begin automatically. If the installation doesn’t start automatically, open the DVD contents with Explorer and start the “Setup.exe” file manually by double-clicking it. Installing the Download Data: After purchasing a download, you will receive two important emails from the IKARUS online shop. One contains the activation key, the other the link to the installation data. Please open this email first and follow the instructions on the download page. Save all RC10 installation data locally on the Windows computer where you want to install aeroflyRC. Move the downloaded files from the Downloads folder to a folder on the desktop, e.g., named “RC10-Install,” and double-click the setup.exe file. |
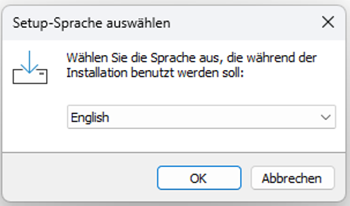 The installation begins with selecting the program language. You can also easily change the language later directly from the aeroflyRC. You do not have to repeat the installation. The installation begins with selecting the program language. You can also easily change the language later directly from the aeroflyRC. You do not have to repeat the installation. |
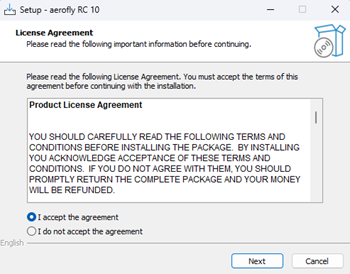 1.3. Confirm the license agreement and click next. 1.3. Confirm the license agreement and click next. |
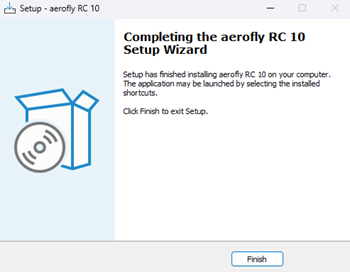 1.4. Start the installation and wait for the message that the installation has been completed. Click “Finish” to close the installation process. 1.4. Start the installation and wait for the message that the installation has been completed. Click “Finish” to close the installation process.You will now find two new aeroflyRC10 icons on the desktop. Start the aeroflyRC10 with the “aeroflyRC10” icon. The second one is only for starting in the VR mode (with a virtual reality headset). |
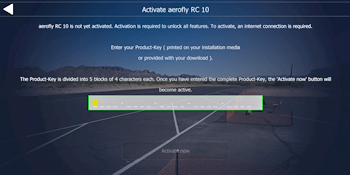 1.5. When you start the aeroflyRC10 for the first time, you will see a yellow line with an activation message on the blue main screen. Click on the line to get the activation dialog shown in the image on the right. If you are unsure whether the aeroflyRC will run on the PC, skip the activation. You can first fly an airplane and also check or replace the graphics card driver. Once the program is running, you can activate it. Once activated, all models of your program version will be available. 1.5. When you start the aeroflyRC10 for the first time, you will see a yellow line with an activation message on the blue main screen. Click on the line to get the activation dialog shown in the image on the right. If you are unsure whether the aeroflyRC will run on the PC, skip the activation. You can first fly an airplane and also check or replace the graphics card driver. Once the program is running, you can activate it. Once activated, all models of your program version will be available. |
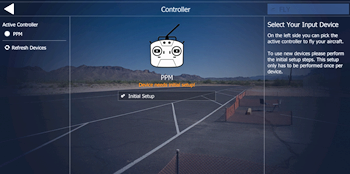 1.6 To set up the control device, click on the “Controller” menu item in the blue main screen. The window shown on the right opens. If a control device has been recognized, a line appears stating that the device requires a basic setting. Now click on “Initial Setup”. 1.6 To set up the control device, click on the “Controller” menu item in the blue main screen. The window shown on the right opens. If a control device has been recognized, a line appears stating that the device requires a basic setting. Now click on “Initial Setup”. |
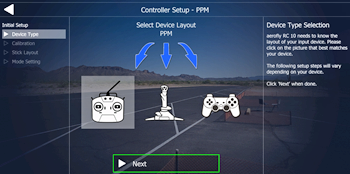 1.7 When using the IKARUS RC FlightController or an IKARUS interface, select the left pictogram with the transmitter symbol. 1.7 When using the IKARUS RC FlightController or an IKARUS interface, select the left pictogram with the transmitter symbol. |
|
In the aeroflyRC10 manual you will find further information on setting up a controller or RC transmitter in Chapter 6. |
2. Step: Check for updates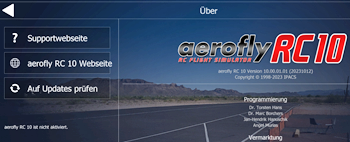 On the blue home screen, click on “About aerofly”. Here you can check whether a free update is available for your aerolfyRC10. On the blue home screen, click on “About aerofly”. Here you can check whether a free update is available for your aerolfyRC10. |
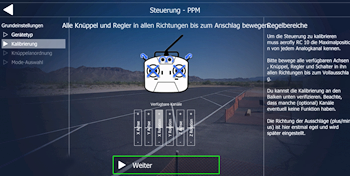 1.8. Now follow the instructions for calibrating the RC flight controller or your own RC transmitter in combination with an IKARUS interface. If you suspect a connection error or perhaps even defective hardware, please follow the instructions on this page to